How to design UPCE barcodes using Packaging Industry Barcode Software
Barcode Software for packaging supply and distribution industry helps you to generate distribution industry specific barcode labels in linear barcode font standards. You can create packaging barcode labels in various colors, fonts, shapes and sizes according to your requirements.
Generate Barcode Label using Linear barcode fonts.
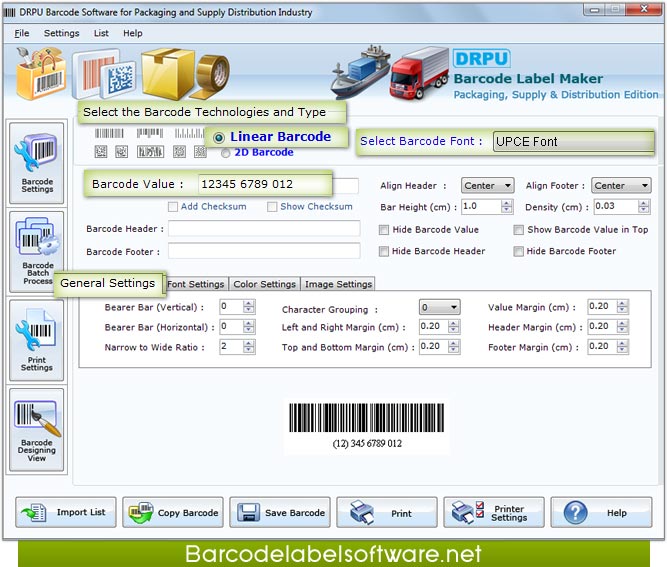
On clicking Barcode Settings the following window appears –

UPCE barcode generator
How to design UPCE barcode label ?
Select the Linear Barcode font option as shown in the figure above
The above window includes following options as –
» Select Barcode Font: Select the Barcode Font for example UPCE Font
» Barcode Value:Enter the Barcode Value. (Select “Add Checksum” and “Show Checksum” options if required while creating barcode label)
» Checksum – Checksum is a value used to check the integrity of barcode value.
» Barcode Header: Enter the Barcode Header details.
» Barcode Footer: Enter the Barcode Footer details.
» Align Header: Set the Barcode Header to "Left, Center or Right".
» Align Footer:Set the Barcode Footer to "Left, Center or Right".
» Bar Height (cm): Set the Bar Height (Bar Height is the vertical height of the bars in barcode label)
» Density (cm): Set the Density (Density is the width between barcode bars)
» Hide Barcode Value: Select to Hide Barcode Value.
» Hide Barcode Header: Select to Hide Barcode Header.
» Show Barcode Value in Top:Select to Show Barcode Value in Top.
» Hide Barcode Footer: Select to Hide Barcode Footer.
You can also change the Barcode Settings using following tabs –
↪ General Settings
↪ Font Settings
↪ Color Settings
↪ Image Settings

◉ General settings [View Screenshot]

General Settings tab includes following options –
» Bearer Bar (Vertical) – Set the Vertical Bearer Bar value. (Bearer bar are the horizontal and vertical lines which are printed in contact with the top and bottom of the barcode)
» Bearer Bar (Horizontal) – Set the Horizontal Bearer Bar value.
» Narrow to Wide Ratio – Set the Narrow to Wide Ratio value.
» Character Grouping –Set the Character Grouping value (Character Grouping allows to group barcode values in specific sets)
» Left and Right Margin (cm) –Set the Left and Right Margin.
» Top and Bottom Margin (cm) – Set the Top and Bottom Margin.
» Value Margin (cm) – Set the Value Margin.
» Header Margin (cm) – Set the Header Margin.
» Footer Margin (cm) – Set the Footer Margin.
» How to design distribution barcodes for packaging industry ?

◉ Font Settings [View Screenshot]

Font Settings tab includes following options –
» Barcode Value Font –Select the Barcode Value Font.
» Barcode Header Font – Select the Barcode Header Font.
» Barcode Footer Font –Select the Barcode Footer Font.

◉ Color Settings [View Screenshot]

Color Settings tab includes following options –
» Barcode Color – Select the Barcode Color.
» Barcode Background Color –Select the Barcode Background Color.
» Barcode Header Color – Select the Barcode Header Color.
» Barcode Footer Color – Select the Barcode Footer Color.
» Barcode Value Color –Select the Barcode Value Color.
» How to design linear barcodes using barcode generator for packaging supply and distribution industry?

◉ Image settings [View Screenshot]

Image Settings tab includes following options –
Select Clipboard Image Type –
» Bitmap(Bitmap is the type of image format used to store digital images)
» Resolution Independent Metafile (Resolution Independent Metafile is a high resolution image file format to save the barcode label)
» Image DPI – Enter the Image DPI (Dots Per Inch) value while you copy or save barcode image (DPI (Dots Per Inch) specifies the resolution of output devices such as scanner and printer)
» Orientation –Rotate the barcode image in 0, 90, 180, 270 degrees.
Save Barcode: Click "Save Barcode" button to save the generated barcode label.
Copy Barcode: Click "Copy Barcode" button to copy the generated barcode label. You can paste the copied barcode in MS-Word, MS-Excel, MS-Paint etc.
Print: Click "Print" button to print the generated barcode label.


